


Tips for taking better photos: Master The Color Wheel
Learn how to create visually harmonious food images through the play of color + a practical case

This is the 5th edition on this series, where we explore the fundamentals of photography, with a special focus on how to capture food.
You can catch up with the previous numbers here:


I cannot believe the last edition of this series was 6 months ago! It was defenitely time to get back to it and to finally look into a topic I particularly love: color!
Color is a powerful tool to use in design and in the visual arts. It can evoke feelings of serenity or make us feel awaken and excited. The study of how colors interact, the visual effects of specific color combinations, and the psychological and cultural meanings of color is what experts call “color theory”. There’s a lot to it, but today we’ll stick to the essentials, and focus on how to use different color combinations in our food photos.
As a reminder, this post is for everyone, no matter how far you’ve come into your photography journey or the equipment you have. We’ll talk about fundamentals that you can apply with a fancy camera or just with a phone! Let’s get to it!
All the images below have been taken by me (styled, shot and edited), or created by me.
The Color Wheel
The color wheel was first developed by Sir Isaac Newton through his experiments with light. It’s a circular diagram that organizes colors in a way that shows their relationships to one another. In essence, we find:
Primary Colors — which cannot be created by mixing with other colors: red, blue, yellow.
Secondary Colors — created by mixing two primary colors: purple, green, orange.
Tertiary Colors — created by mixing primary and secondary colors.
The position of the colors in the wheel helps visually identify the relationships between each of them. One clear cue are the Complementary Colors, which are located directly opposite each other on the wheel: red-green / blue-orange / yellow-purple. We’ll see how to use them later on.

Warm Colors vs. Cold Colors
The color wheel also helps us identify warm colors and cool colors instantely. It’s pretty obvious, but warm colors include red, orange, and yellow, and variations of those three colors. They are the colors found in fire, fall leaves and most cooked food! In general they feel energizing but also warm and comforting, depending on the tint and tone used (see below).
Cold colors include green, blue, and purple. They are the colors of the sea, the trees and are usually calming and relaxing. In food photography, they are great combined with the warm colors of our food (more on the combinations later). And they can also represent freshness (a crisp salad), and something cold (like ice on top of a summer beverage).
Hue, Tint, Shade and Tone
The colors mentioned before are also referred as hues. Their intensity, or saturation, can vary if we apply black or white to it, creating different tints, shades and tones of an original color.
Tint — created by mixing the base color (hue) + white: ex. Pink, sky blue, mint green…
Shade — created by mixing the base color (hue) + black: ex. Burgundy, navy blue, forest green…
Tone — created by mixing the base color (hue) + gray, affecting both brightness and saturation.
White, black and gray are considered neutrals, and are often found in food photography as background colors to our food, when we want the focus to be 100% on the dish we are photographing. Still, it’s always recommended not to lean completely on pure black and white, as they can darken or overexpose your image. It’s better to find a dark gray or a creamy/light gray white —think not only the background but also your ceramics, cutlery, etc.
Harmonious Color Schemes
The following are tried and tested color combinations that will make your image feel harmonious and balanced. Some, will be calming and others will be more contrasty and fun, but all have in mind the theory of the color wheel.
Analogous Color Scheme
This combination plays with colors that are next to each other in the color wheel, so the image feels natural and calming. Depending on the shade and tint of colors you use, you can have something more muted or more vibrant.
You can combine 3 or 4 analogous colors —one will be your main color, a second will be your supporting color, and the third one, your accent color. The color of your food will normally be your primary color and the accent ingredients or background and props will add the second and third colors.
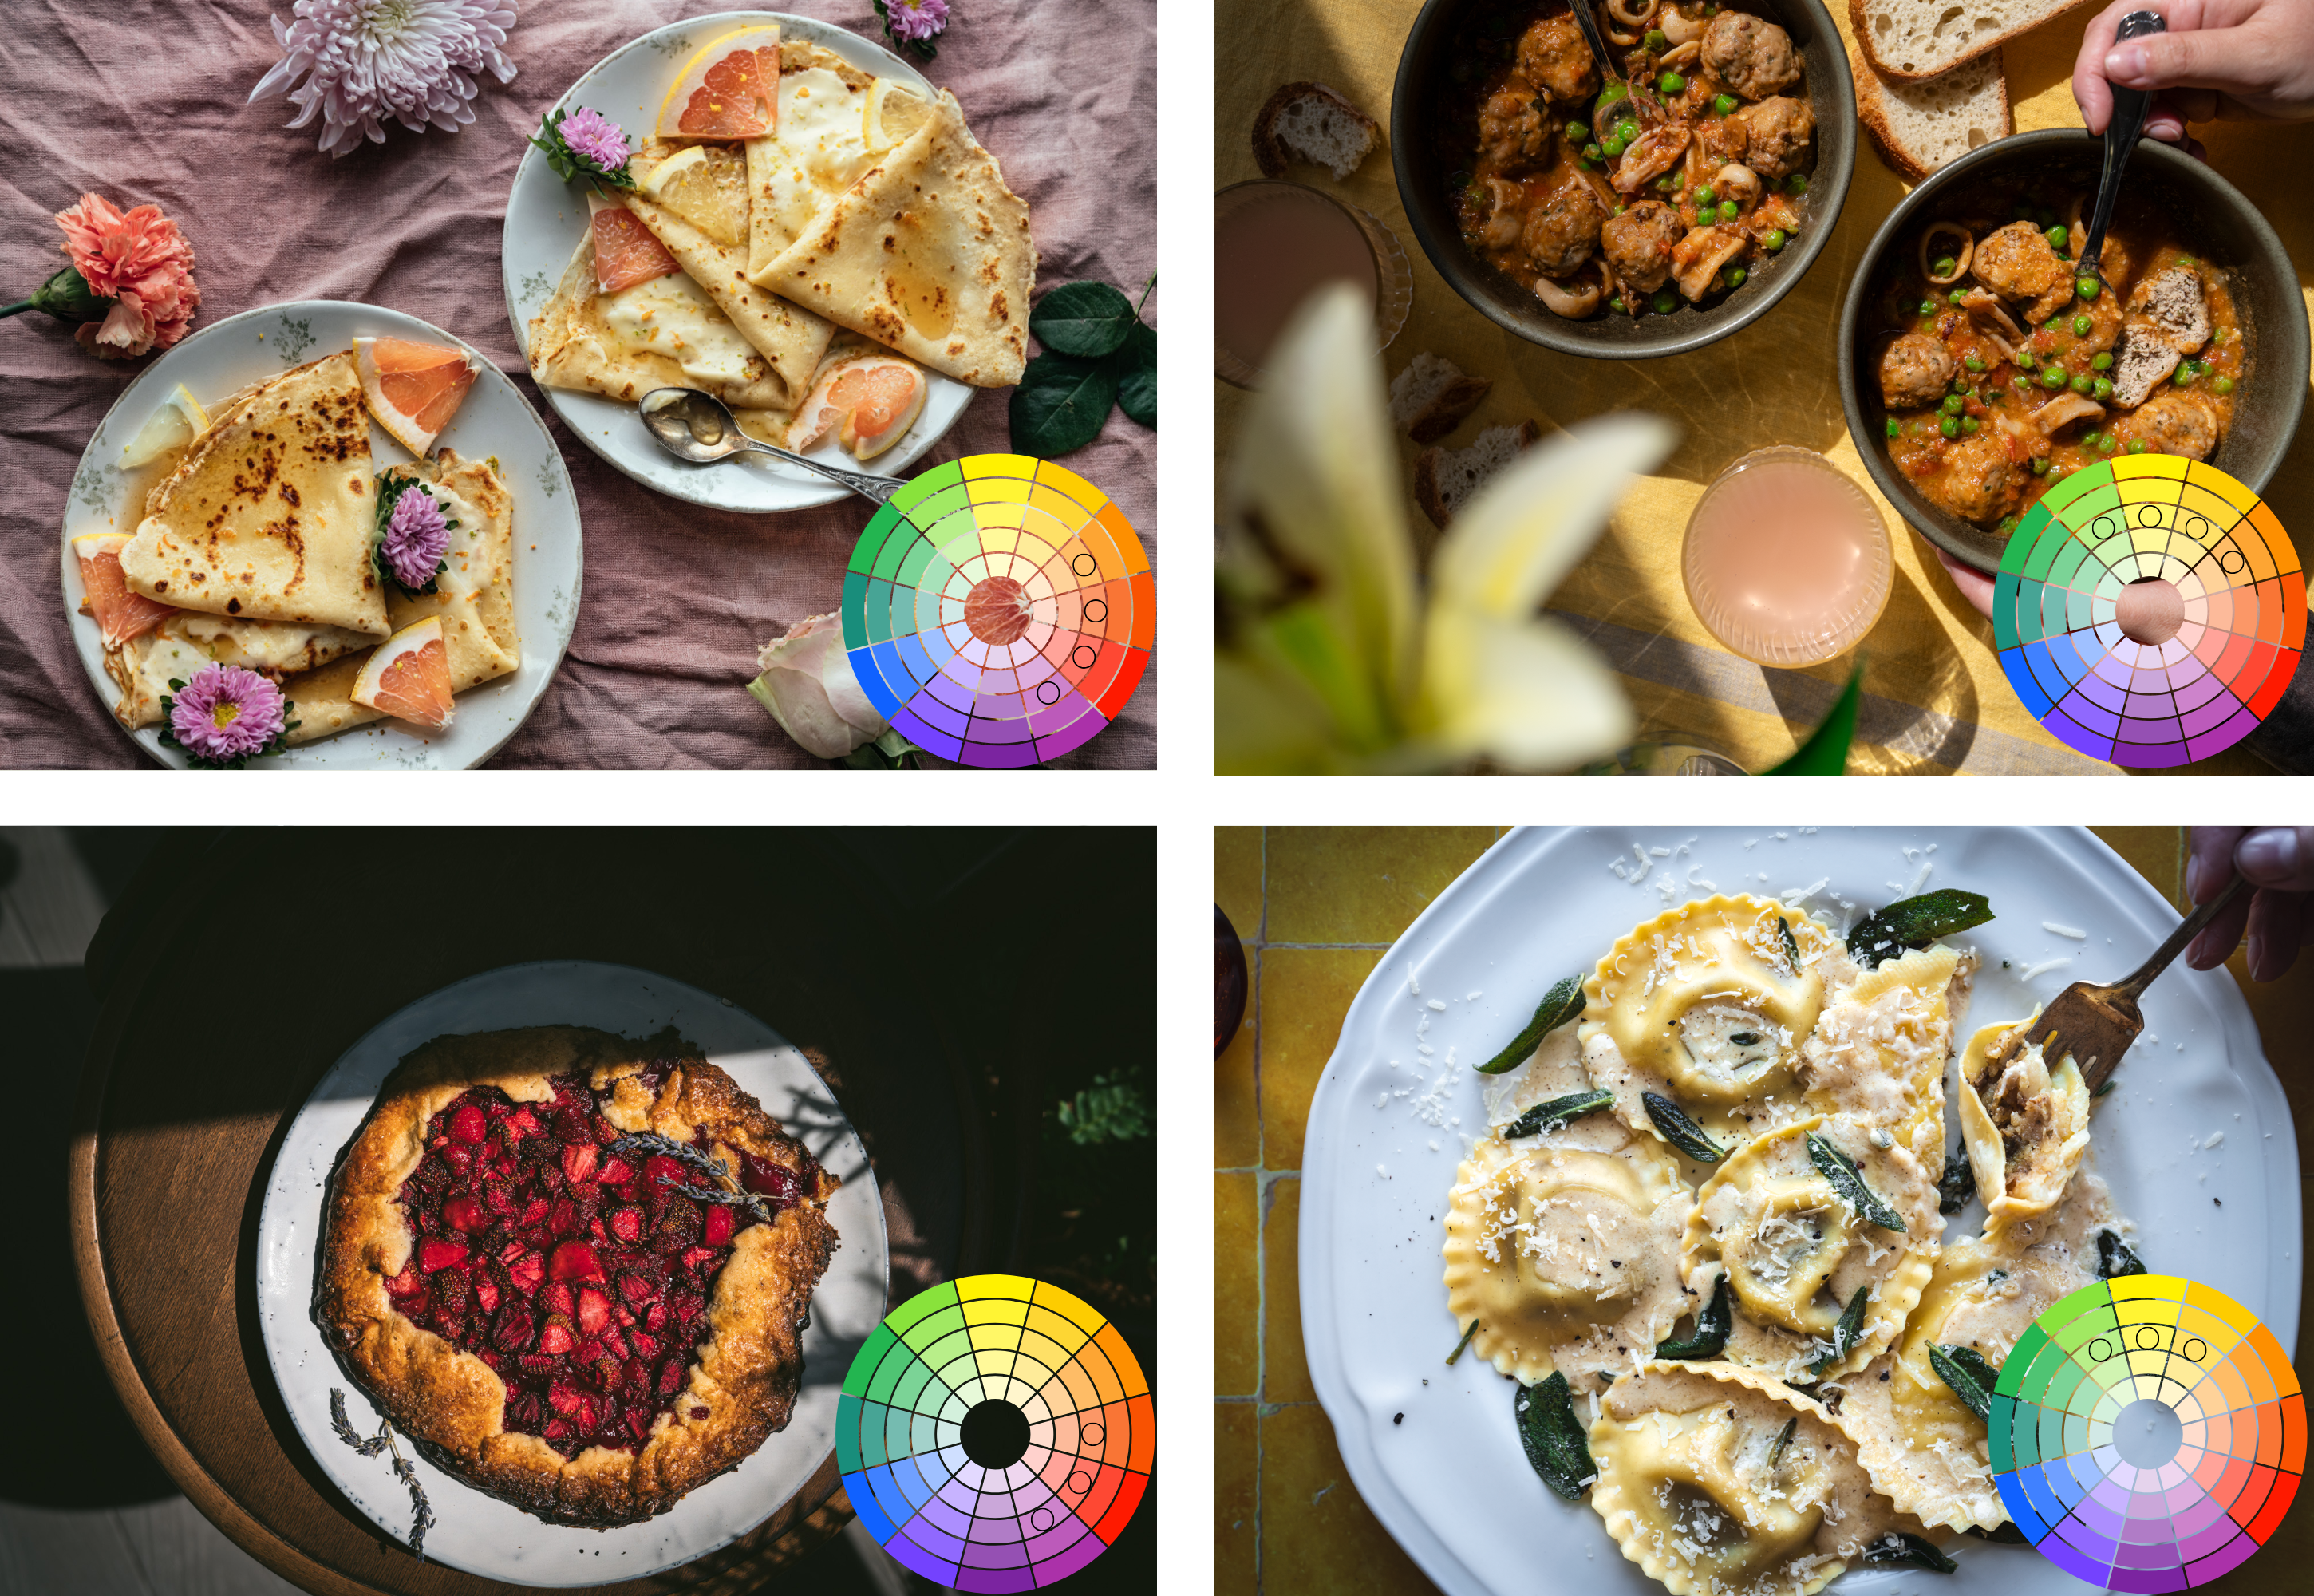
In the crepes and the ravioli, my main color was the yellow, but then I opted for pushing it to the pink side with the crepes photo; while continuing with the yellow in the ravioli photo and going for a touch of green as an accent (crispy sage). On the other cases, my main color was the orange for the meatball stew, with a touch of green (peas), so I continued with yellow and soft orange for my backdrop, flower and drink. Finally, my galette had a touch of orange (crust) but it was mainly red, so I leaned on the purple for an accent with the lavender and kept the backdrop neutral.
Monochromatic Color Scheme
This is a combination of shades and tints rather than hues. It takes one color (orange, green, red…), and plays with different tonalities within that color. Your background can also be colorful (like I did in the ice cream shot) or neutral (with a grayish marble). The wood may be considered neutral, but actually it’s also playing into the monochromatic color scheme by adding another shade of orange to the pie photo.
In this case, the color of your food will determine the main hue you’ll be playing with. Just try to keep it interesting and balanced by adding different tones and textures.

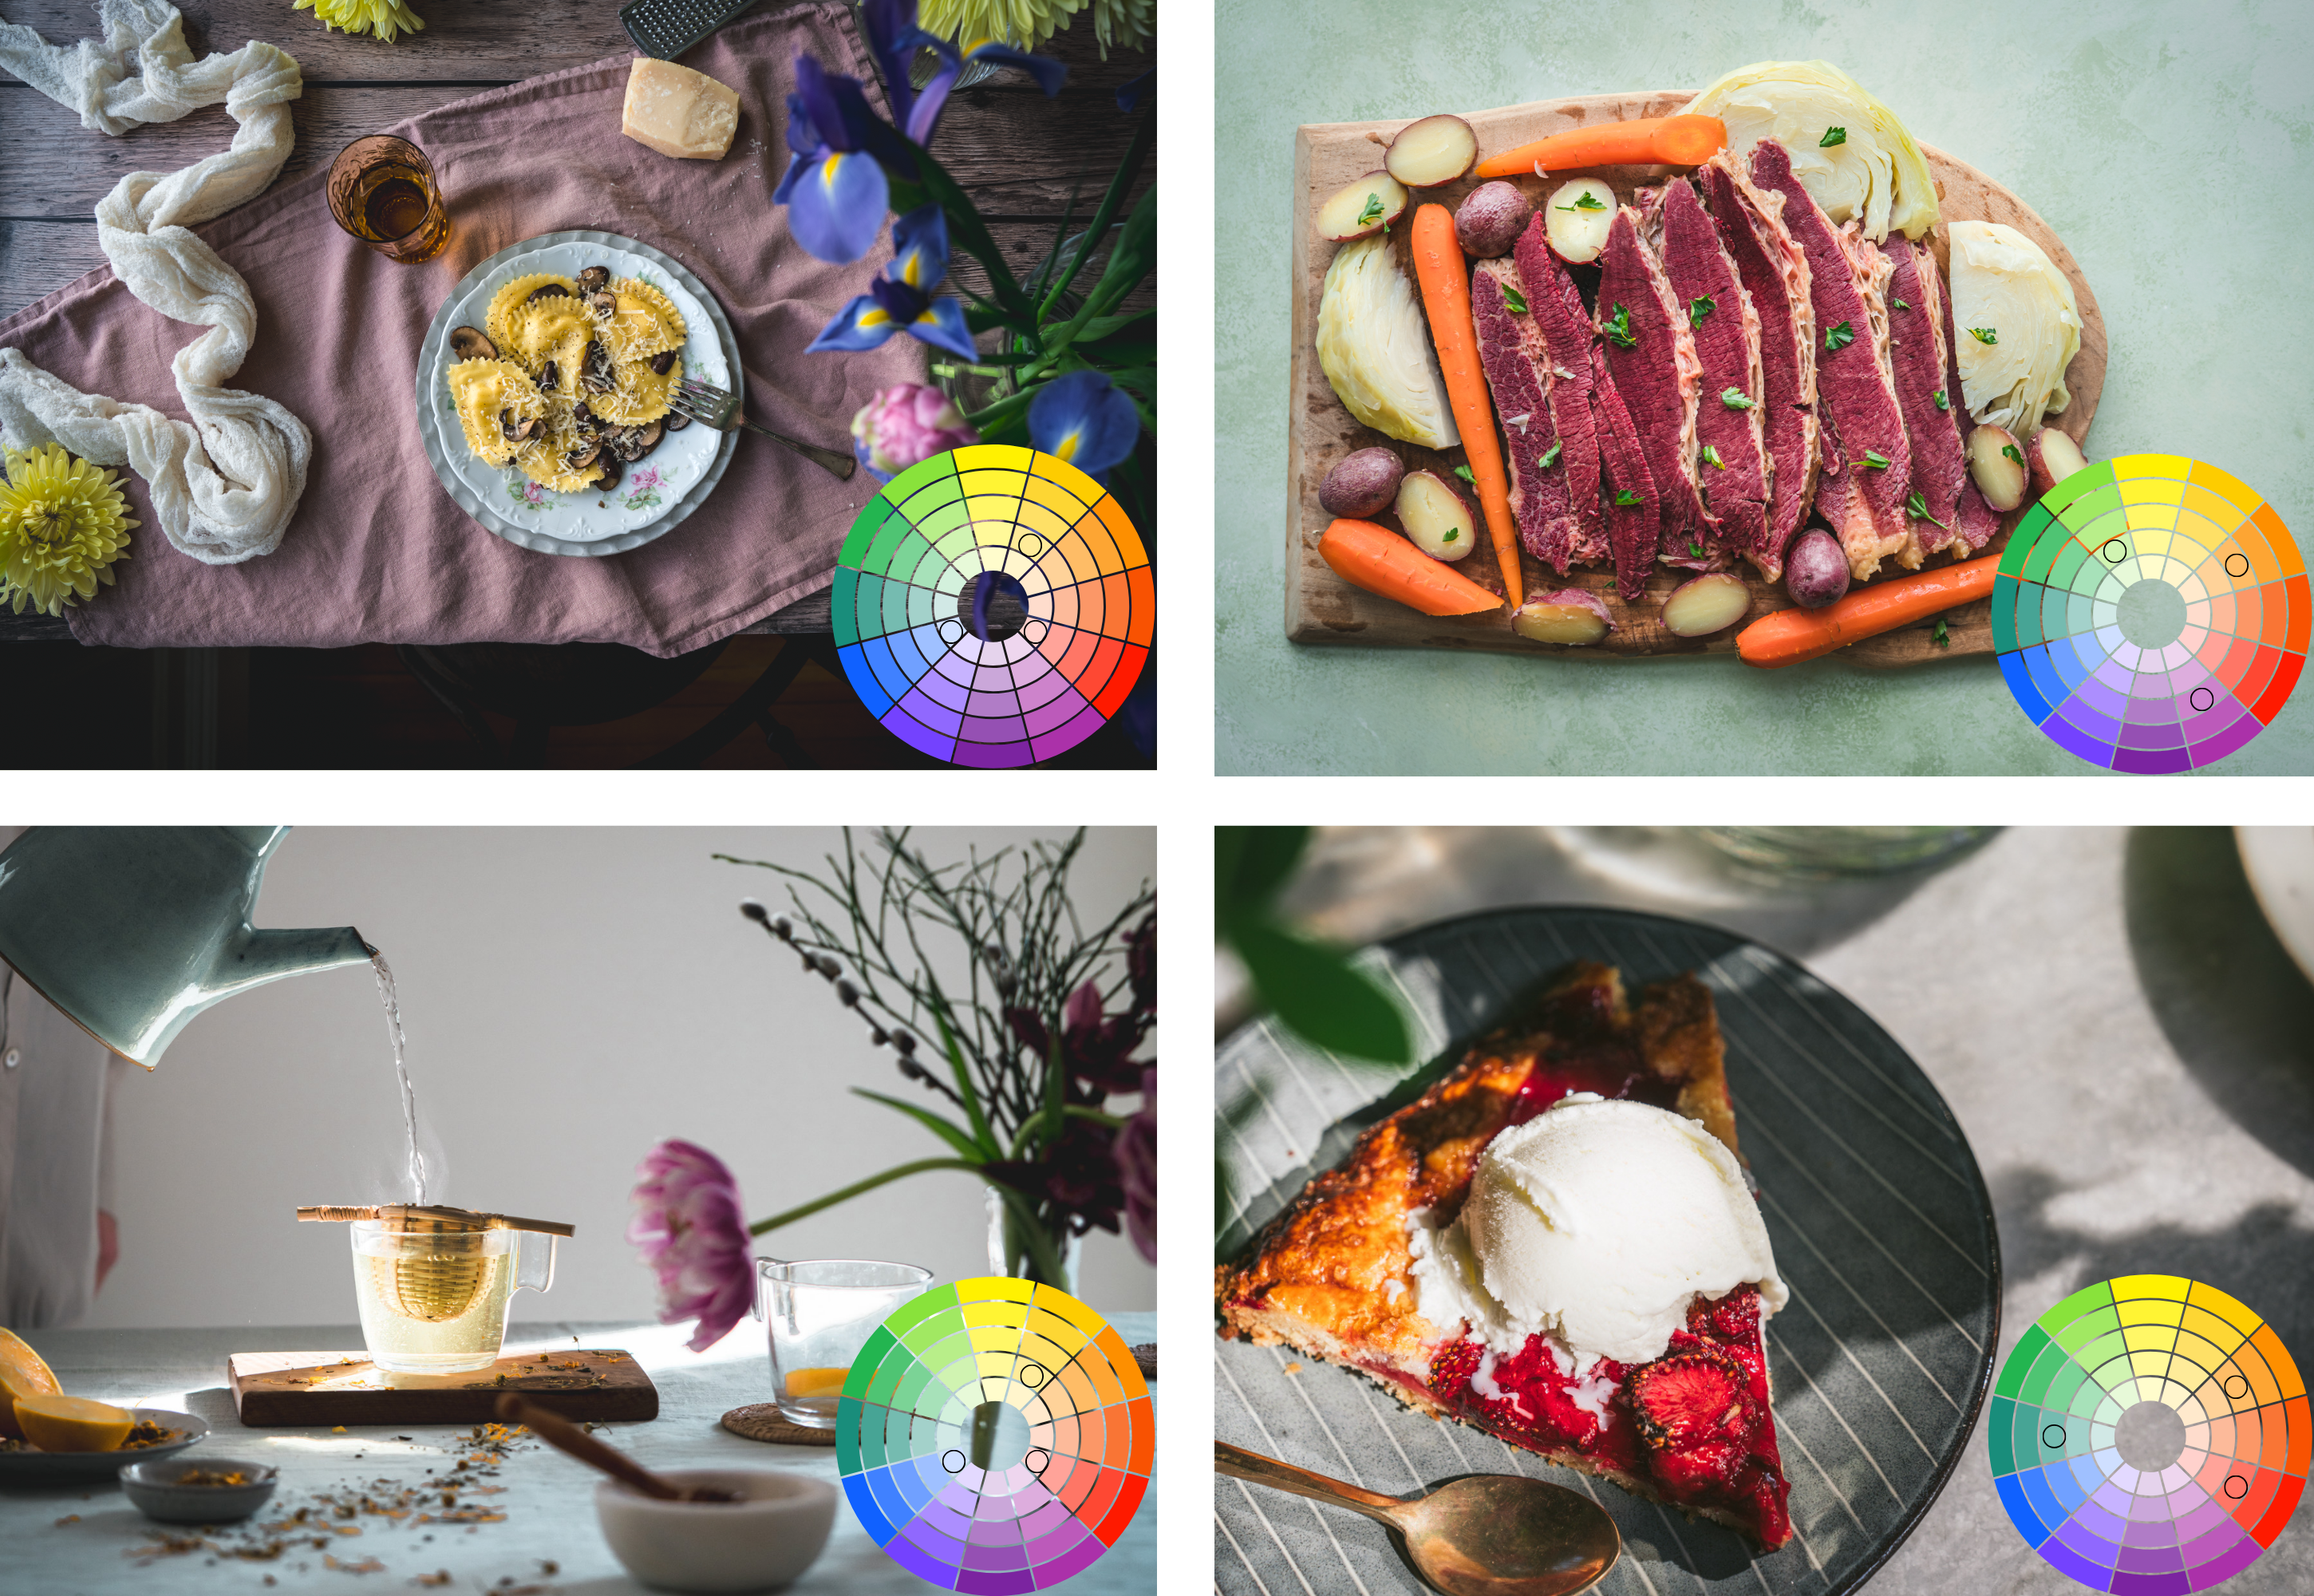
Complementary Color Scheme
We have already mentioned complementary colors —they are the ones that sit in opposite sides of the wheel (red-green /yellow-purple /blue-orange), mixing warm and cool hues. These combinations are high in contrast and create a lot of visual interest. Normally they feel exciting and energetic, but they can also be played down with different shades and tints.
See, for example, the image of the peach ice cream and the ones below. They all combine blue and orange, but in the last ones, the blue is more toned down and so they feel more warm and cozy than the ice cream one. Obviously, the mental connection we make when we think of ice cream or when we think of hot tea bring us to different places, but we can accentuare that with the tones and shades we choose as well. Summer calls for vibrant and more saturated colors, while fall and winter call for more muted accents. Continue reading to see how to take this into practise.
More Complex Color Schemes
We have covered the simplest color combinations, that will get you far if you use them in your coming photoshoots. But if you want to go even further, there are some more complex schemes that will take the edge of your images and make them even more interesting visually.
Split-Complementary Color Scheme
This variation uses a base color (ex. orange) and instead of using the direct complement (blue), it uses the two colors next to it on either side (purple and green). It creates dynamic but more harmonious images.

Triadic Color Scheme
This combination, uses three colors that are evenly spaced around the color wheel, forming a triangle. The most basic ones would be a primary triad (red, blue, yellow) or a secondary triad (orange, green, purple). But you can choose triadic colors and shades and tints within those colors! So make it yours!
Tetradic Color Scheme
Often, in food photography, it’s more difficult to stick to 2 or 3 colors than to play with several. Our food has tones and shades and a pie crust may look orange and yellow in different places. This is why knowing how to combine 4 or more colors is also useful.
A tetradic color scheme, also known as a double-complementary scheme, utilizes four colors arranged into two complementary pairs on the color wheel. This configuration forms a rectangle or square, offering a rich and vibrant palette that balances contrast and harmony.
Tips to acheive a balanced color story - A concrete example
Once we have understood the color wheel and its combinations we can see how to actually put that into practise. Where to start?
Let’s see a real life example. The last recipe I shared in the newsletter was on a Catalan stew that mixes meatballs, cuttlefish and peas. My starting point (as it always is), was the color of my food. Rather brown-orange with a pop of green.
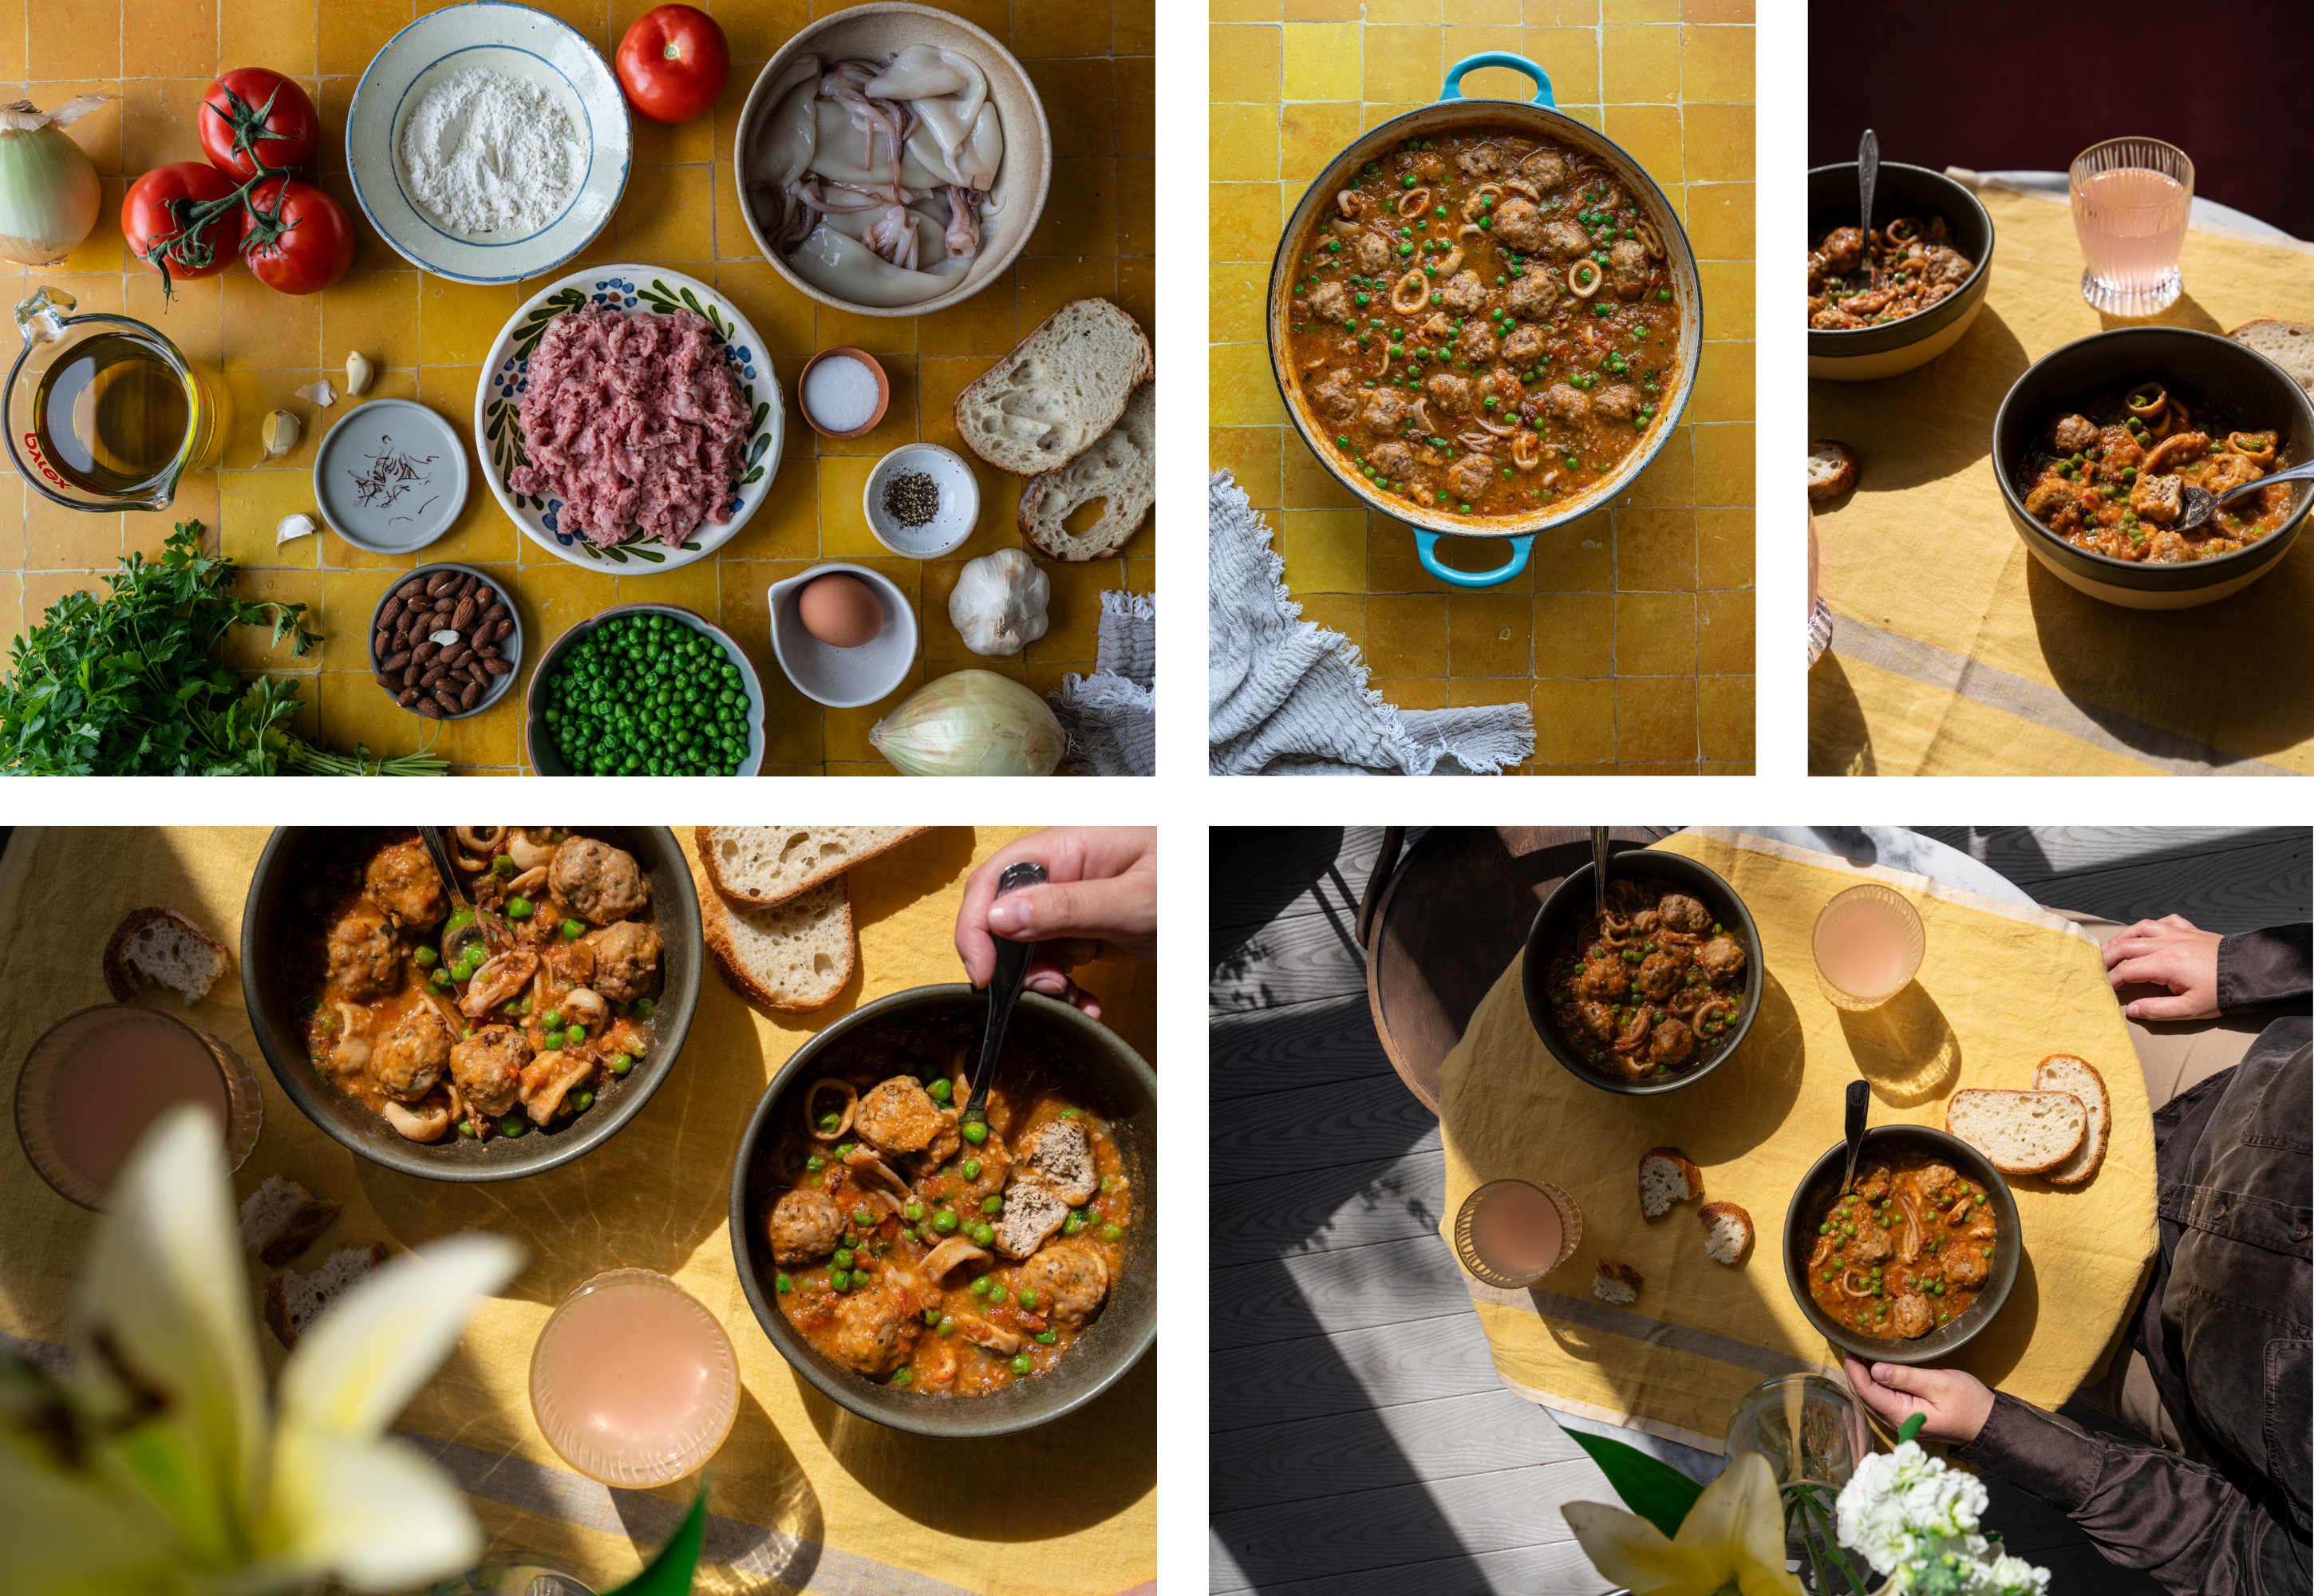
What’s the story you want to tell?: For me it was about evoking the Mediterranean Catalonia and the May sun. That influenced the colors I went for and the props I chose.
Choose your color scheme: I decided to go with analogous colors as my food was already leaning that way. Orange, yellow, green, red, brown.
Choose your background color: As I was going for a similar color to orange (my main color from the food), I decided to use a yellow background (first a tile vinyl and then a linen for the table setting). Yellow it’s associated with the sun and cheerful and vibrant times. Just perfect for my story.
Choose the accents: Once I knew my narrative and my main colors, I chose the rest of elements keeping that in mind. The bowls are a dark brown that makes the food pop and also leans into the analogous color scheme. The drink is a soft salmon that connects with the color story and helps imagine a sunny setting. I added flowers in a soft yellow and vibrant green, connecting to the green of the peas.
Balance warm and cool hues: Food is normally on the warmer side, so it’s always interesting to have some cool accents to counterbalance it. In this case, I was defenitely leaning warm, but my peas added a bit of a cool tone, which was mirrored by the leaves of the flower. I then decided to add some slightly cool touches letting the marble countertop of the table show through and the gray floor planks as well. My chosen linen was yellow but also had gray stripes which connected all those cool tones beautifully.
Think about your clothes: If you decide to be in the frame —and it’s more than just a hand, you will need to think about what you are wearing as well. It’s all part of the same color story! In this case, I went for a dark brown shirt, that connected with the brown of the bowls and chairs, and light brown trousers. Neutral but on target.
Keep your colors in mind when editing: Finally, you can also modify your colors slightly in post production. With an editing software (I use Adobe Lightroom Classic, but their Mobile version is free), you can make a green cooler or warmer, or a yellow more or less saturated. I would recommend to adjust brightness and saturation to prevent from visual overload, though! In this case, I made sure all my colors made sense together and I adjusted the pink of the drink to be more salmon than bright purple. This way, it felt more analogous to the rest of the colors. Just remember not to modify the color of your actual food (the drink was a supporting actor, not part of my recipe)!
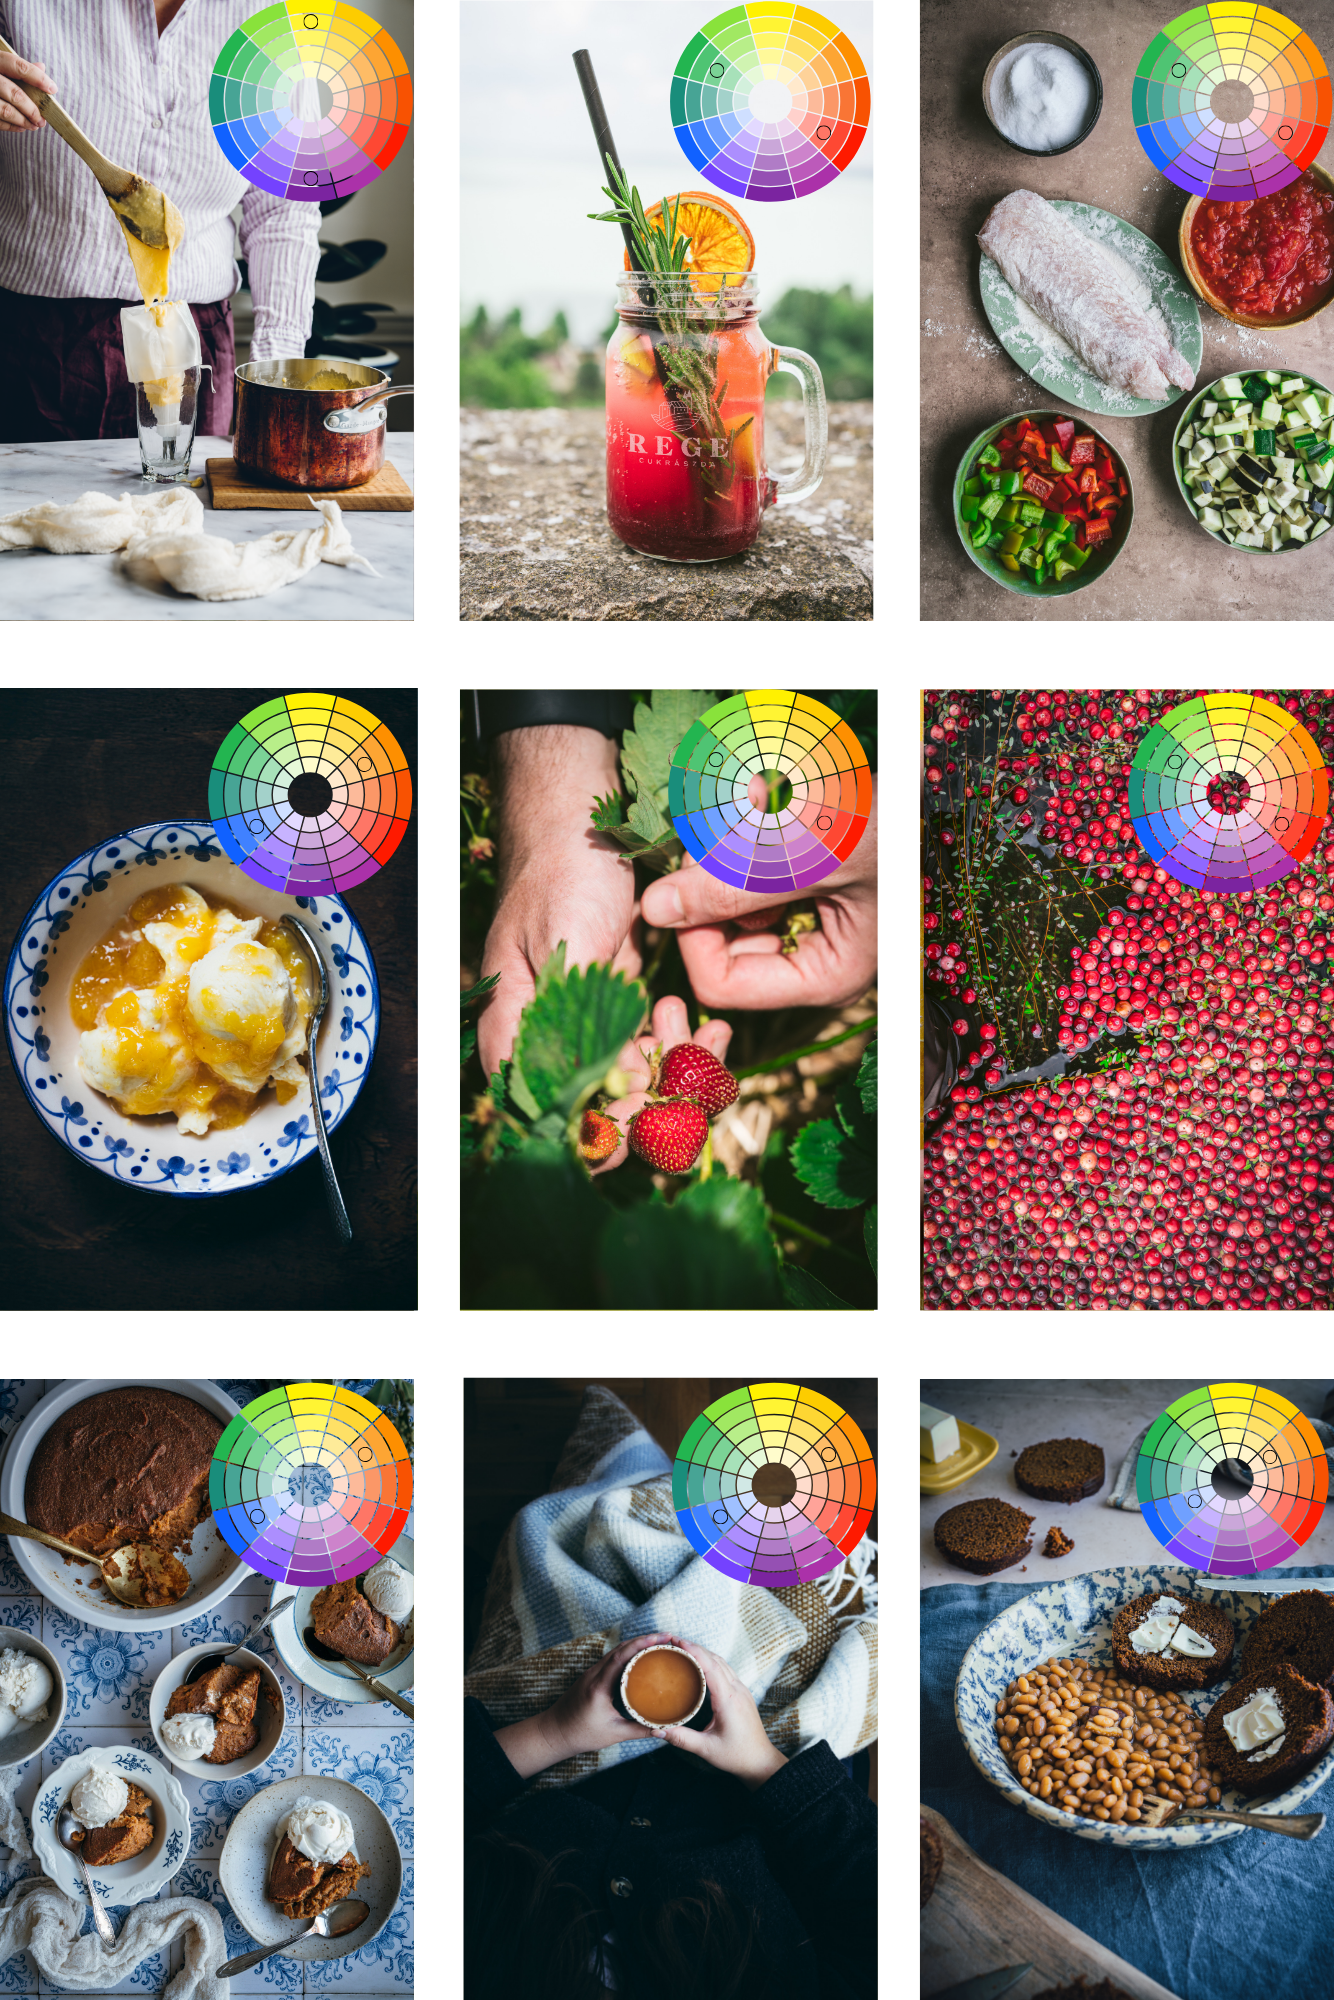
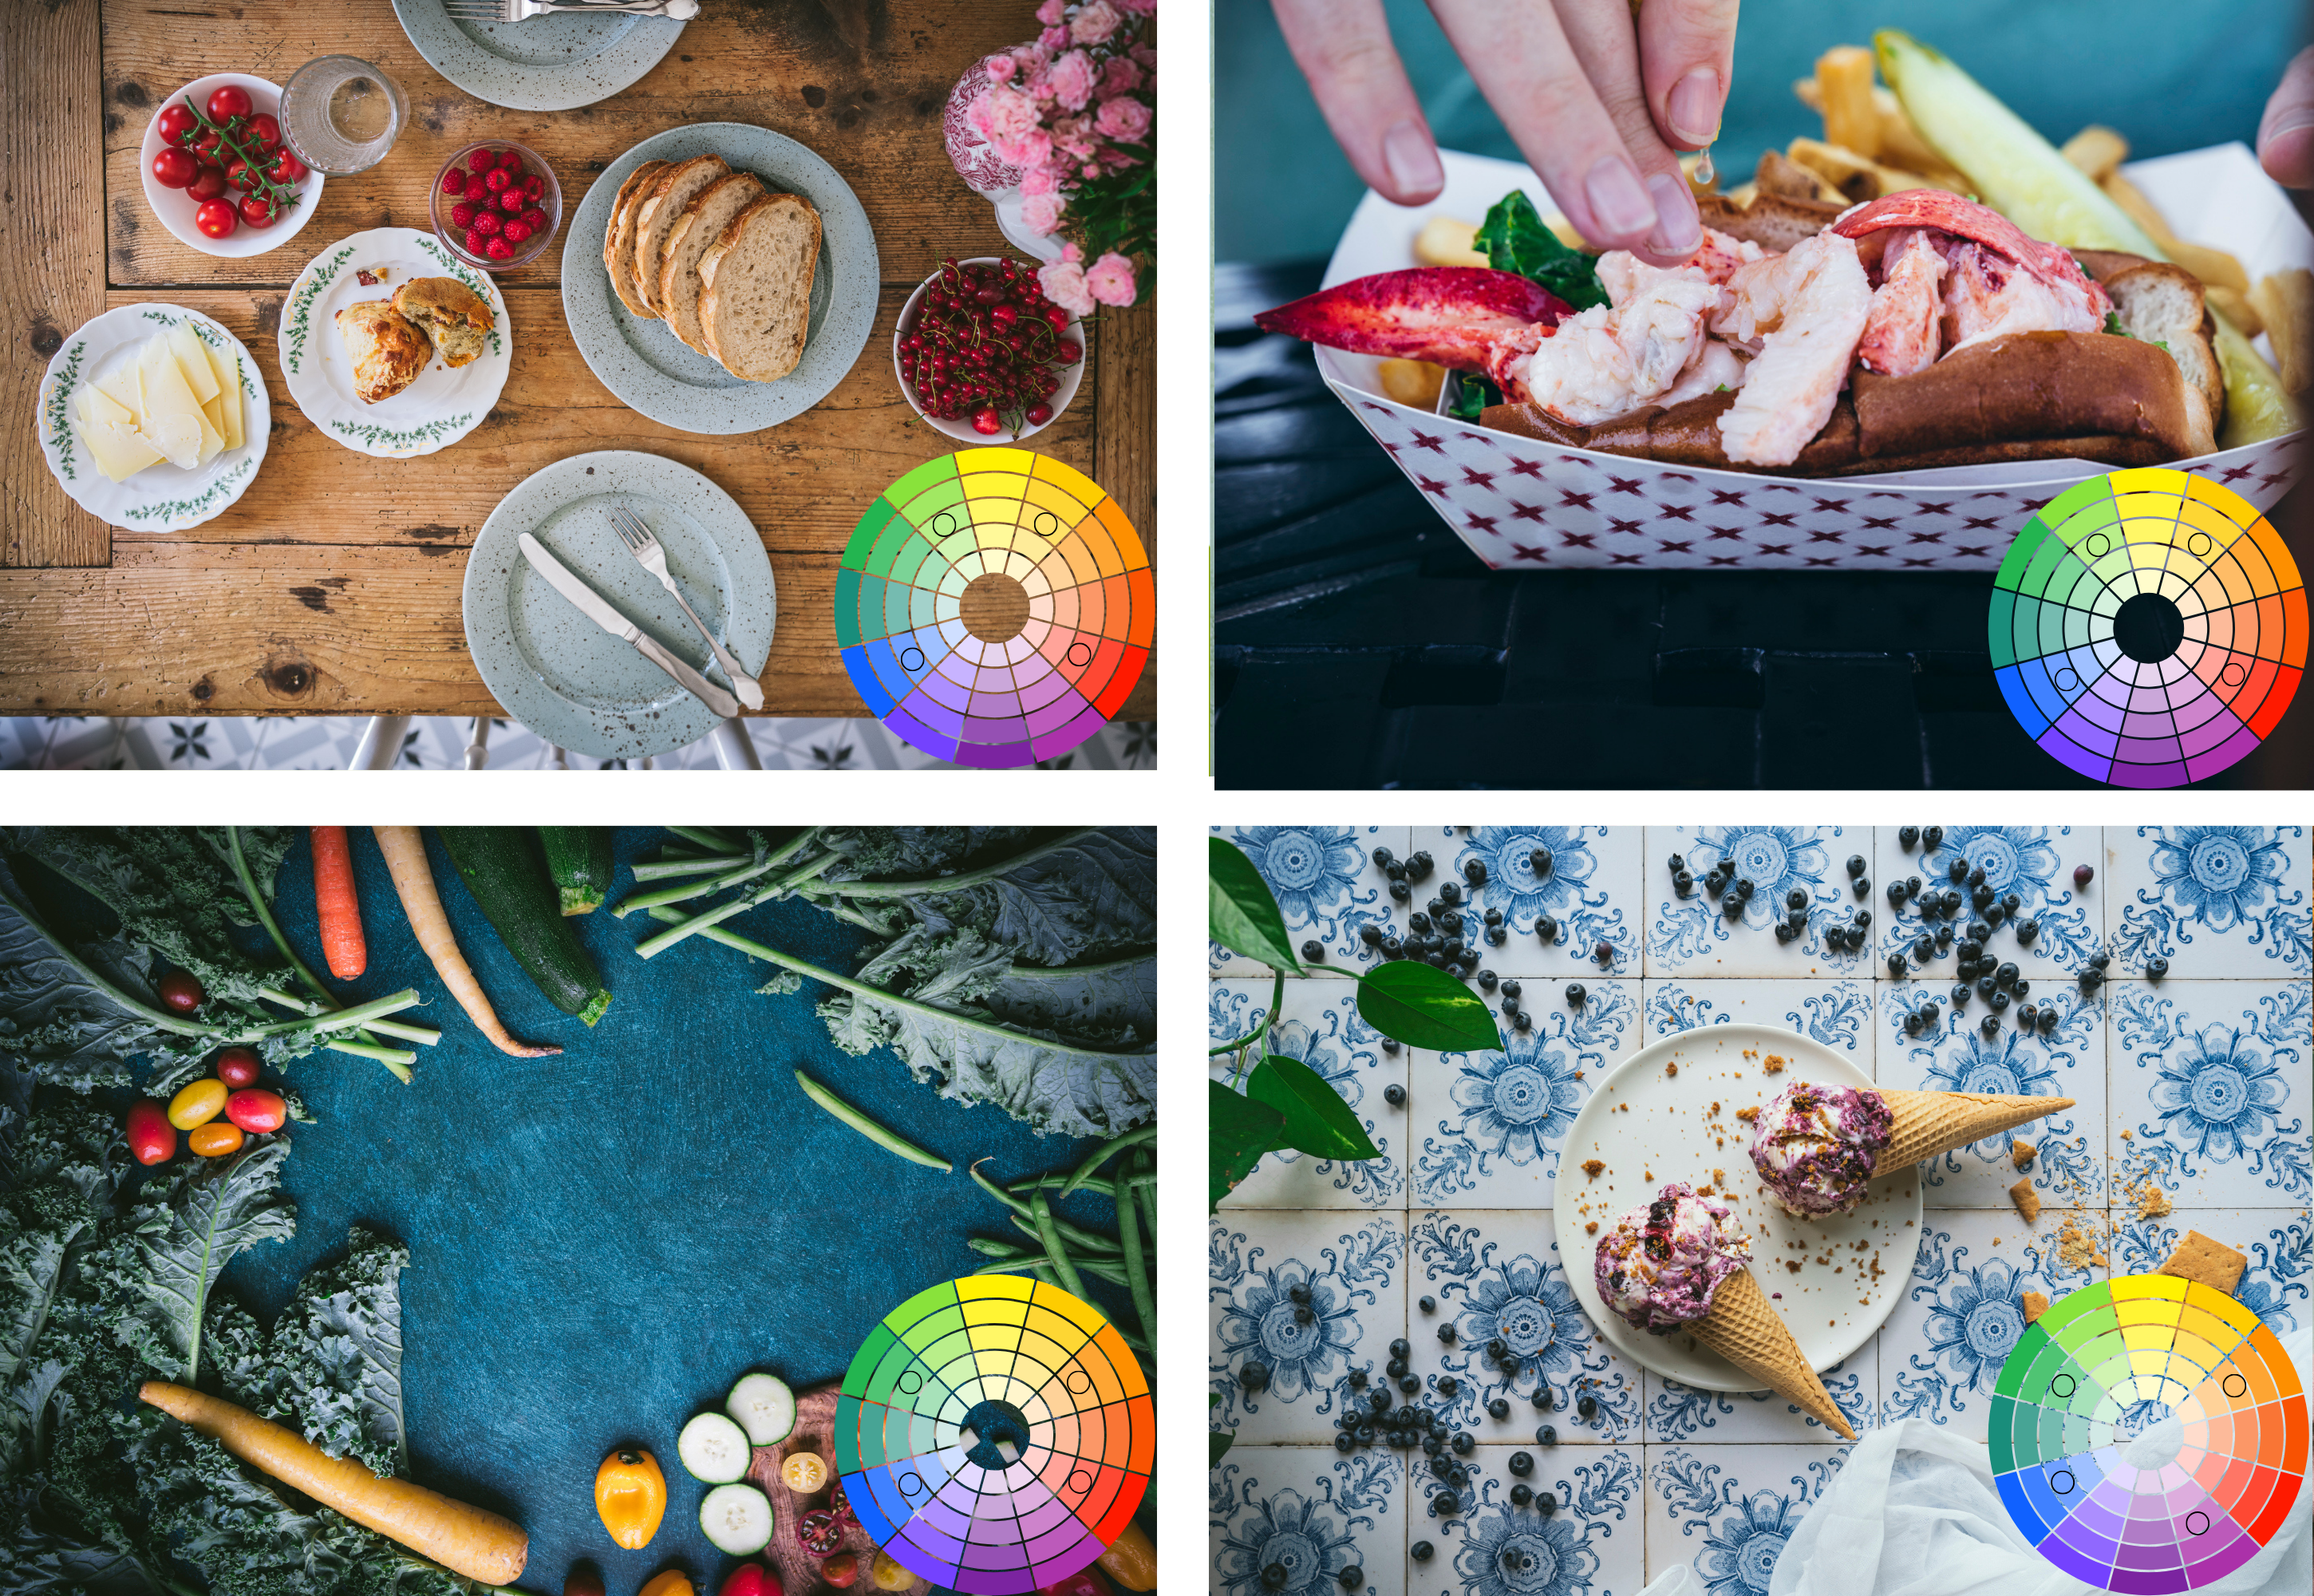
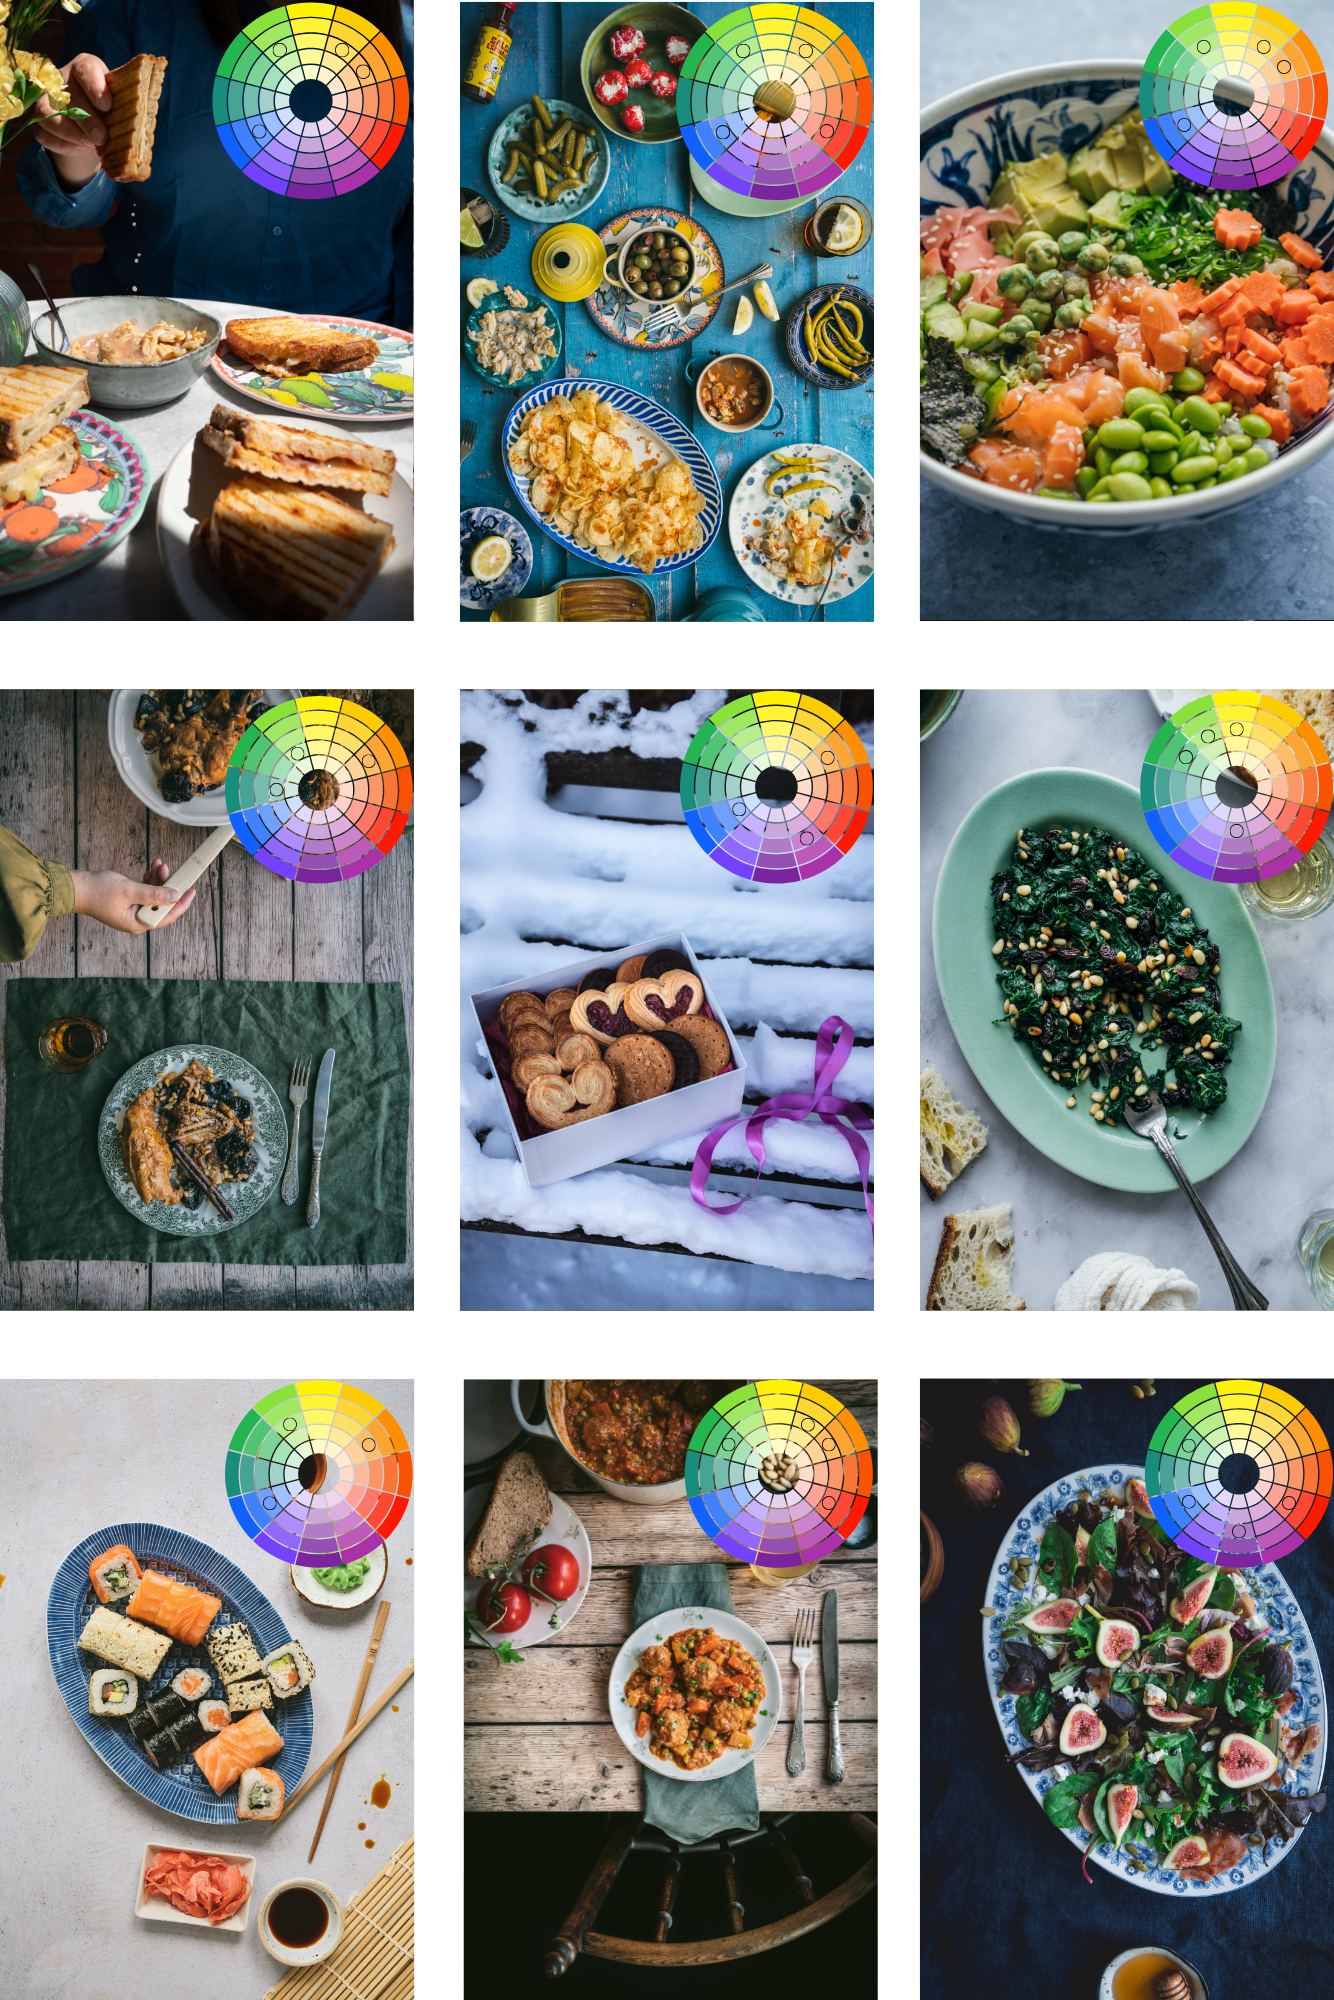
A little exercise
Cover the color wheel and see how many color schemes can you identify in these photos?
To wrap it up
To wrap it up, here’s a summary of what we’ve been talking about:
Study the color wheel and its combinations.
Decide on your dominant color (normally it will be your food).
Choose your color scheme (connecting it with the story you want to tell).
Choose your accent colors (decide the background, the props, your clothes…).
Keep your color story in mind when editing.
Play with shades and tones to avoid visual overload.
Have fun experimenting and tag me in your photos so I can see them!
I just love these posts. You are so generous with your knowledge and I try to absorb and hopefully adopt whatever I can can. Thank you!
Love the dessert photos!